
A hairline crack in your patio or driveway concrete can feel like no big deal. It’s thin, it’s quiet, and it’s easy to ignore.
Then a Trenton winter shows up. Water slips into that crack, freezes overnight, and expands like a wedge. By January, that “tiny line” can turn into a wider split, a chipped edge, or a rough spot that keeps spreading.
This guide covers practical concrete crack repair steps for hairline cracks, plus how to choose the right repair material, work safely, and protect the slab before freeze-thaw season.
Why hairline cracks get worse fast in Trenton winters
Concrete is strong in compression, but it doesn’t like movement, moisture, or rapid temperature swings.
In Mercer County, patios take hits from:
- Freeze-thaw cycles that expand water inside small voids and cracks
- Rain and wet leaves that keep the surface damp for long stretches
- Deicing salts that can scale the surface and weaken the top paste layer
- Poor drainage that creates ponding near control joints and low spots
A hairline crack isn’t always “structural,” but it’s still an open path for water. Sealing it before winter is less about looks and more about limiting water entry.
A quick “Before you start” checklist (and safety notes)
Before you touch the crack, set yourself up for a clean, lasting repair.
Checklist
- A stiff nylon brush and a shop vacuum
- Putty knife or margin trowel (even for small cracks)
- Crack filler (matched to crack width and movement)
- Clean water, rags, and a small bucket
- Painter’s tape (helps keep edges neat)
- Weather check: pick a dry day with temperatures staying above the product minimum for the full cure time
Safety basics
- Wear eye protection and gloves. Crack fillers can burn skin or irritate eyes.
- Avoid dry grinding. Concrete dust can contain respirable silica. If you must abrade, use wet methods and wear a properly fitted N95 or respirator rated for silica.
- Read the product label and SDS. Many sealants and solvents need airflow. Keep kids and pets away until cured.
Step one: confirm it’s really a hairline crack (and if it’s moving)
Not all “small” cracks are equal. A smart repair starts with a quick diagnosis.
Measure width and look for offset
Use a ruler or a crack gauge card.
- Hairline usually means less than 1/16 inch wide.
- If one side of the crack sits higher than the other (vertical offset), that points to soil movement or slab lift. Filler won’t solve that.
Also check for spalling (flaking or chipping) along the crack edge. That often means water and salt have already started breaking down the surface.
Decide if the crack is moving Or Expanding
Moving cracks open and close with temperature and moisture changes. You’ll see clues:
- The crack runs long and fairly straight across the slab.
- It crosses control joints.
- You see repeated failure of old filler.
- The crack is near a corner or an outside edge where the slab can curl.
If the crack is moving, a rigid patch tends to pop out. Flexible sealants handle movement better.
When a “hairline” crack needs a pro
Call for an inspection if you see:
- Cracks wider than 1/4 inch
- Any vertical displacement
- Cracks that keep growing month to month
- Signs of heaving near steps, a foundation wall, or a settled section (common in older properties around Chambersburg, parts of Hamilton, and areas with mixed fill)
Those conditions usually need more than surface-level driveway or patio crack repair.
Pick the right material (by crack width and movement)
Choosing the wrong product is the fastest way to waste a weekend. Match the repair to the crack.
| Crack condition | Best-fit product type | Why it works |
|---|---|---|
| Less than 1/16 inch, not moving | Low-viscosity concrete crack filler (liquid) or polymer-modified cement slurry | Flows into tight cracks and bonds to the walls |
| Less than 1/16 inch, may be moving | Flexible concrete repair caulk (polyurethane or similar) applied thin | Stays flexible through seasonal movement |
| 1/16 to 1/4 inch, not moving | Polymer-modified repair mortar or paste-style crack filler | Fills and rebuilds without sagging |
| 1/16 to 1/4 inch, moving | Polyurethane sealant (flexible) | Handles expansion and contraction better |
| Surface is rough or scaled | Concrete resurfacer plus crack treatment underneath | Levels small defects and improves appearance |
Epoxy vs polyurethane (simple rule): epoxy cures rigid. Polyurethane stays flexible. For exterior slabs that see temperature swings, flexible is often the safer bet unless you’re solving a specific structural detail.
How to fix hairline cracks in a concrete patio/Driveway (nuts-and-bolts steps)
The goal is simple: clean the crack walls, fill fully, then let it cure without water getting in.
1) Clean like you mean it
Most bond failures come from dust and residue.
- Sweep the area.
- Scrub the crack with a stiff brush.
- Vacuum the crack slowly. A shop vac with a narrow nozzle works best.
- If there’s grease or patio grime, wash, rinse well, then let it dry fully.
If the patio has a sealer, some fillers may not bond well. Light abrasion can help, but don’t create silica dust. Wet-sanding or a damp abrasive pad is safer than dry grinding.
2) Open the crack only if the product requires it
Some paste fillers and mortars need a wider “V” to grab. Many pourable fillers do not.
If the label says to rout or widen the crack, follow it. If it doesn’t, don’t create extra damage.
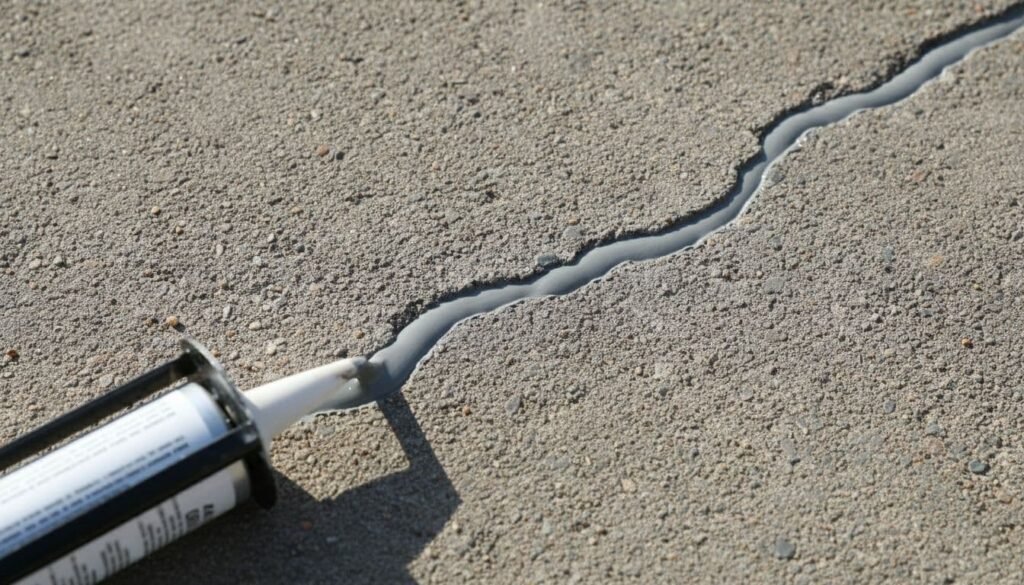
3) Apply the filler in controlled passes
- Tape both sides of the crack for a cleaner finish (optional).
- For pourable filler, pour slowly and chase it along the crack so it can soak in.
- For caulk-style sealant, use a steady bead, then tool it tight with a putty knife.
- For cement-based slurry, force it into the crack, then scrape flush.
Don’t leave a hump. High spots catch snow shovels and wear faster.
4) Follow cure times
Cure time is not just a suggestion. If rain hits early, the filler can foam, wash out, or lose bond.
Plan on keeping traffic off the repair until it’s firm, and avoid pressure washing for at least several days (longer if the product says so).
Seal the Concrete before winter (and avoid common mistakes)
After the crack repair cures, consider a penetrating sealer. It reduces water absorption without making the surface slick like some film-forming products can.
A few practical points:
- Don’t seal damp concrete. Trapped moisture can cloud sealers and weaken the bond.
- Avoid applying right before a cold snap. Many sealers need mild temperatures for proper cure.
- If you use deicers, pick a sealer that tolerates salt exposure, and use deicers sparingly.
Also, check drainage. If water ponds near the house or along an edge, that area will keep stressing the crack.
Time and cost ranges (realistic expectations)
Most hairline crack repairs are quick, but prep and cure are the real schedule.
- Time: 1 to 3 hours of hands-on work for typical patios, plus 24 to 72 hours of cure time (depends on product and weather).
- Cost: roughly $20 to $80 in materials for small areas. If you add a penetrating sealer for the whole patio, materials often cost around $40 to $150 based on coverage and slab size.
If you’re repairing lots of cracks, scaling, or worn spots, resurfacing can cost more but may look better than spot repairs.
Troubleshooting: when the repair doesn’t go as planned
Crack reappears
This usually means movement. Switch from rigid fillers to a flexible sealant, such as the ones Sika makes, and check for drainage issues or base problems.
Filler won’t bond
Common causes are dust, old sealer, or applying to damp concrete. Clean again, let it dry, and confirm the product is compatible with sealed surfaces.
White powder or streaks (efflorescence)
That’s mineral salts moving through moisture. Clean with a stiff brush and water first. If it keeps coming back, focus on reducing water entry with a penetrating sealer and better drainage.
Spalling along the crack
Surface paste may be weak from freeze-thaw or deicer use. Remove loose material, patch with a polymer-modified repair mortar, then seal after cure.
When it’s time to stop DIY and get an inspection
Hairline cracks are often manageable, but some patios and driveways in Trenton and nearby towns sit on soils that shift. If you see heaving, settlement, wide cracks, or offset edges, it’s smart to schedule a professional evaluation. Those signs can point to base failure, poor compaction, or drainage problems that surface filler can’t reliably fix.
A clean repair now, plus sealing and drainage attention, is the difference between a small fall project and a bigger spring replacement. Concrete crack repair works best when you treat the cause, not just the line you can see.
Also, keep in mind that the material in this guide can be helpful for any concrete cracks you may have, including cracks around your pool, in your garage, and so on. Reach out to our team if you have questions about your situation. We’d be happy to schedule a free estimate.